Chef Marco's Recipes and Hints
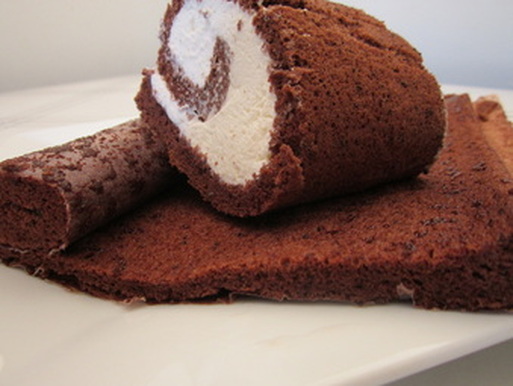
Foolproof Chocolate Swiss Roll Recipe:
|
Swiss Roll Video
|
This recipe fills a standard, 13 x 18 inch 1/2 sheet pan for a thin roll up cake, a double recipe makes a thicker one for layer cakes cut to a desired shape.
It can also be poured, using a spatula to scrape out all the batter, into cake or loaf pans of various sizes (fill half full).
5 large eggs separated
1/2 cup plus 1 Teaspoon cake flour
1/4 cup unsweetened cocoa powder
1/4 teaspoon baking powder
1/2 cup granulated sugar
1/4 cup water
2 tablespoons vegetable oil
1/2 teaspoon vanilla extract
Pinch of cream of tartar
If a plain or vanilla cake is desired, use 3/4 Cup of cake flour, and omit the cocoa. Feel free to experiment with other extracts, almond or lemon etc., or spices such as cinnamon or nutmeg. I prefer the chocolate cake plain.
Pre -heat the oven to 350 F
Place the yolks, water and oil in a 2 quart bowl or bigger and whisk until blended.
Put the whites in the bowl of an electric mixer, or you can use a hand held mixer. It can also be done by hand with a wire whisk.
Sift all the dry ingredients, minus ¼ Cup of sugar (this is half the amount given in the recipe) and whisk it into the yolk, water, and oil mixture. This makes a smooth batter.
Add the cream of tartar to the whites and beat until the whites look like a beer with froth on the top. Slowly add the reserved ¼ Cup of sugar and beat at medium speed until the whites have the appearance of shaving cream with soft peaks. The whites should have body but they should not be stiff. Whites with stiff peaks make the cake dry.
Mix about 1/4 of the whites into the batter mixture, then fold in gently the rest of the whites in 2 or 3 separate additions. It is OK for there to be some wisps of darker batter. Better that than beat too much of the air out of the cake.
The cake pan bottom should be lined with parchment, sprayed with pan release spray or brushed with oil or butter. When I bake a sheet cake I don’t grease the pan or paper at all.
Pour and scrape the batter into prepared pan.
Place pan in oven and turn down to 325. Bake 16 minutes for a roll up cake, 25 for double recipe and a little longer for cake pans where the batter is deeper. The baked cake should be springy and a toothpick or what have you inserted should come out clean.
For loaf and layer cakes:
Let the cake cool 10 minutes, run a knife around the edge of the pan and invert it onto a cooling rack covered with parchment. Otherwise the cake sinks into the slats and makes a grill pattern on the cake. Let cool completely. Carefully and slowly separate the parchment from the cake, and then place the same used piece of parchment back on the cake to keep it moist. If storing the cake for later or the next day, keep the parchment on and wrap with plastic.
For roll up cake:
Again, use the single recipe, and a 1/2 sheet pan - 13x18"
After the cake comes out of the oven, let it cool on a rack for fifteen minutes, or until cool. Run a knife around the edge to free the cake from the sides of the pan and invert the cake onto a piece of parchment sprinkled with a tiny bit of sugar. (This helps keep the cake from sticking to the paper). Carefully remove the bottom layer of parchment and reserve it. Do this slowly and carefully. A film of the cake will remain on the paper. This is as it should be, but it should be a film and not chunks of cake. Invert the cake again back onto the parchment just removed from the cake and roll up the cake with the paper on the bottom. The cake can now be filled. It should be completely cool. It can also be wrapped in plastic and stored with the paper still on, as this keeps the cake moist and not stuck together.
The roll can be filled with whip cream, custard or jelly, leaving a quarter inch border on either side and the bottom, and an inch at the top. Carefully roll up the cake and cover it with plastic and refrigerate for an hour or overnight. This will make the roll manageable and compact. The roll can be served with a dusting of confectioners sugar, cocoa or just as is. Frost with whip cream or butter cream if desired.
How to make Fresh Pasta
Ingredients:
2 1/4 Cups of All Purpose Flour
3 Large Eggs
2 1/4 Cups of All Purpose Flour
3 Large Eggs
|
|
|
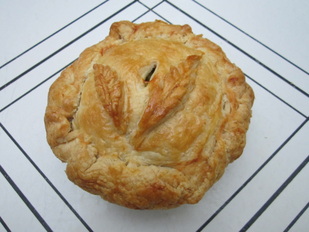
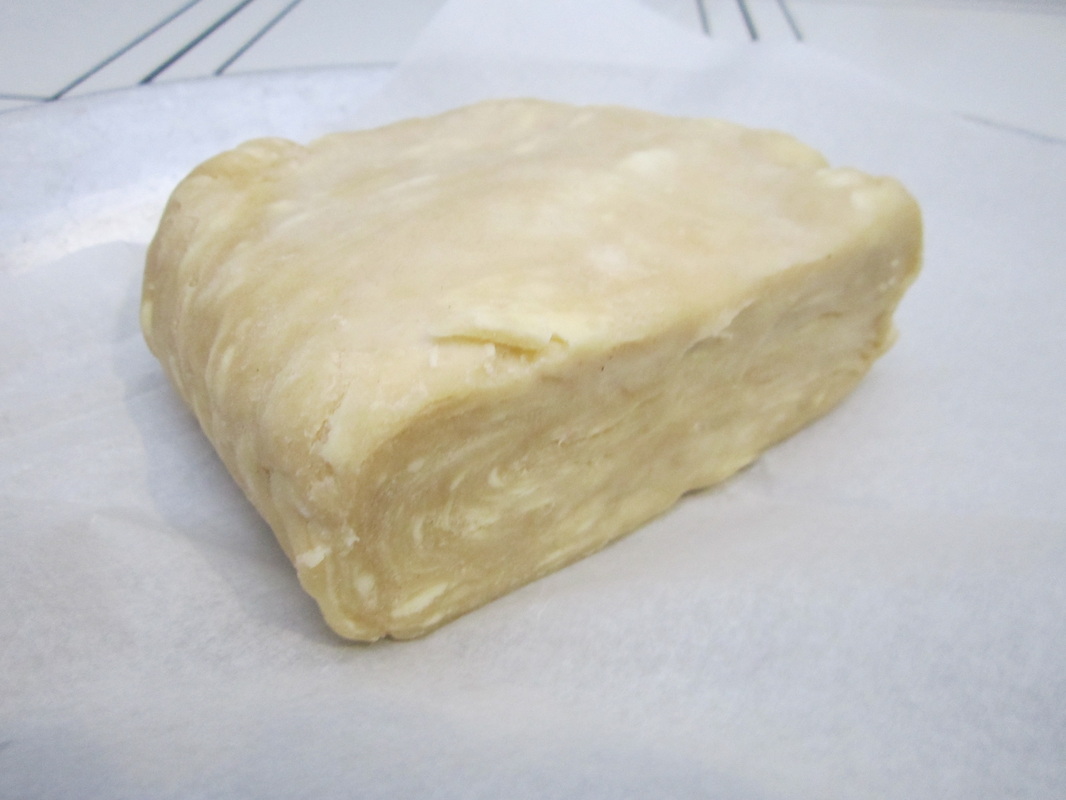
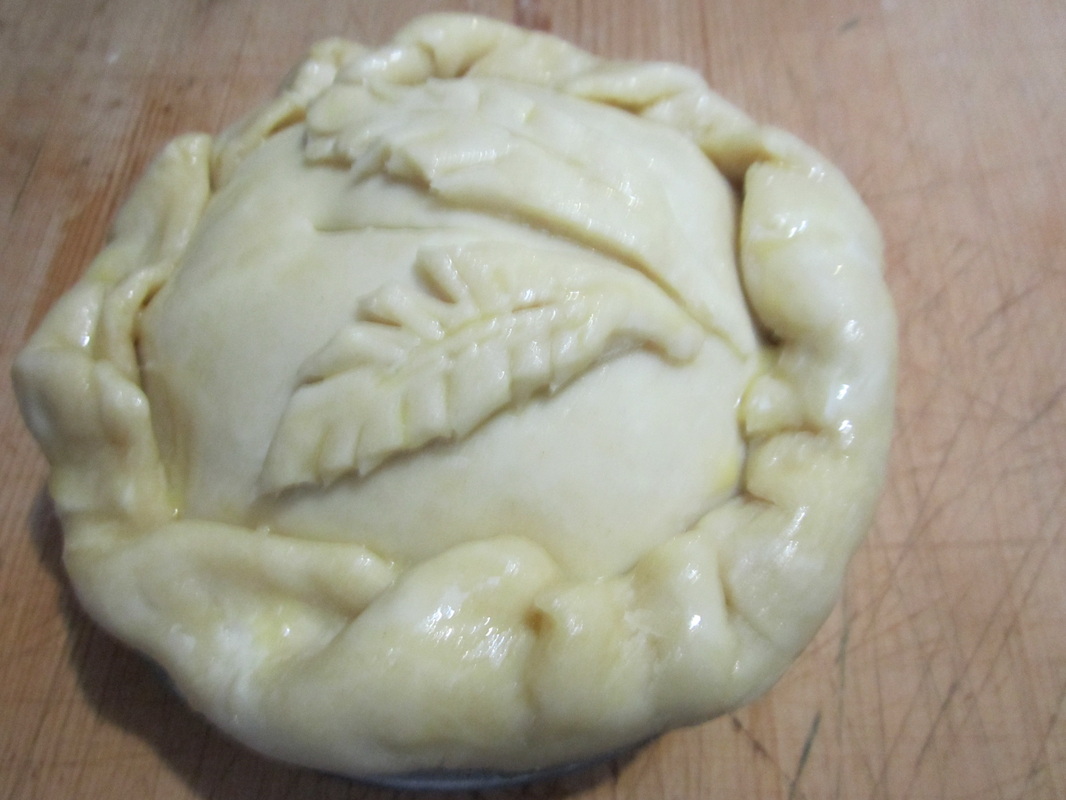
Perfect Pie Pastry:
14 oz. very cold, even frozen butter cut into 1/4 inch chunks
3 oz. vegetable shortening
18 oz. all-purpose flour
3/4 cup ice water
Combine the flour and shortening with your fingers, making a flaking motion between your fingertips.
Add the butter and cut it into the flour shortening mixture with two metal pastry scrapers or (I prefer) two spackling or paint scrapers from the hardware store. They are easier to use, cheaper than the fancy culinary ones and they are perfect for manipulating thin delicate pastry like cookies and such. The handles on the pastry scrapers for me are clumsy and hard to manipulate. Keep cutting, occasionally scraping off any material which has collected on the surface of the scrapers until you achieve what looks like a rough meal. It does not have to be perfect and some of the pieces of flour coated butter will be bigger than others. This is good and makes for flaky pastry.
Strain any pieces of ice from your ice water and add it to the mixture. Push and press the mass together handling as little as possible. You can use your hands but it is messy. I use a wooden paddle or spoon. It will look rough and uneven. Place the mass into plastic wrap, wax or parchment paper and let it rest for at least one hour.
The dough is now ready to be used.
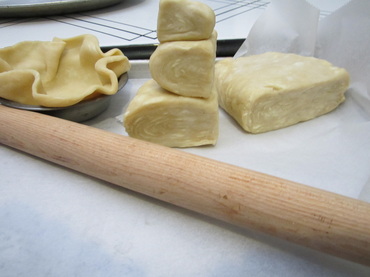
Practice using less and less flour to roll the dough, and brush off the excess on the top with a dry pastry brush. The paint scraper, because of the shape of the handle is the perfect tool to lift up the pastry if/when it sticks to the work surface. Excess flour when rolling makes the pastry tough when it cooks.
Work in a cool place if possible, and if the pastry becomes too warm, (it starts to feel a little sticky) put it in the refrigerator for a bit and then continue.
Pastry is a relationship between fat and wheat flour. The long chains of protein in wheat called gluten form when water is added to flour. Gluten proteins look like a slinky or kinky hair under the microscope and they stretch under pressure and spring back when the pressure is released. Fat shortens these chains and tenderizes pastry dough
and breads. That is why fats are called shortening in baking. When the water is added to the flour and fat mixture it forms a sticky, stretchy layer surrounding each piece of fat (butter, shortening). That is why we let the dough rest in the refrigerator for an hour so that the gluten proteins can relax, and the dough becomes more manageable. In the oven, the butter melts and produces steam which pushes up against the stretchy dough but cannot escape. When the pastry is finished cooking, the steam escapes which allows the starches in the dough to become strong (crispy) enough to stand up by themselves. The pastry dough is no longer held up by the steam but now surrounds air pockets.
14 oz. very cold, even frozen butter cut into 1/4 inch chunks
3 oz. vegetable shortening
18 oz. all-purpose flour
3/4 cup ice water
Combine the flour and shortening with your fingers, making a flaking motion between your fingertips.
Add the butter and cut it into the flour shortening mixture with two metal pastry scrapers or (I prefer) two spackling or paint scrapers from the hardware store. They are easier to use, cheaper than the fancy culinary ones and they are perfect for manipulating thin delicate pastry like cookies and such. The handles on the pastry scrapers for me are clumsy and hard to manipulate. Keep cutting, occasionally scraping off any material which has collected on the surface of the scrapers until you achieve what looks like a rough meal. It does not have to be perfect and some of the pieces of flour coated butter will be bigger than others. This is good and makes for flaky pastry.
Strain any pieces of ice from your ice water and add it to the mixture. Push and press the mass together handling as little as possible. You can use your hands but it is messy. I use a wooden paddle or spoon. It will look rough and uneven. Place the mass into plastic wrap, wax or parchment paper and let it rest for at least one hour.
The dough is now ready to be used.
Practice using less and less flour to roll the dough, and brush off the excess on the top with a dry pastry brush. The paint scraper, because of the shape of the handle is the perfect tool to lift up the pastry if/when it sticks to the work surface. Excess flour when rolling makes the pastry tough when it cooks.
Work in a cool place if possible, and if the pastry becomes too warm, (it starts to feel a little sticky) put it in the refrigerator for a bit and then continue.
Pastry is a relationship between fat and wheat flour. The long chains of protein in wheat called gluten form when water is added to flour. Gluten proteins look like a slinky or kinky hair under the microscope and they stretch under pressure and spring back when the pressure is released. Fat shortens these chains and tenderizes pastry dough
and breads. That is why fats are called shortening in baking. When the water is added to the flour and fat mixture it forms a sticky, stretchy layer surrounding each piece of fat (butter, shortening). That is why we let the dough rest in the refrigerator for an hour so that the gluten proteins can relax, and the dough becomes more manageable. In the oven, the butter melts and produces steam which pushes up against the stretchy dough but cannot escape. When the pastry is finished cooking, the steam escapes which allows the starches in the dough to become strong (crispy) enough to stand up by themselves. The pastry dough is no longer held up by the steam but now surrounds air pockets.
|
|
|
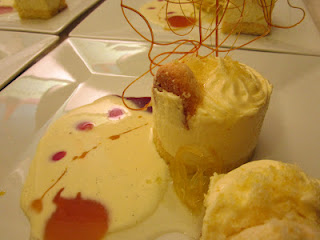
Lemon Chiffon Dessert:
First make a lemon curd using the juice, and rind of 3 big lemons ( I added a little extra juice, ) 8 egg yolks and a cup of sugar. I cooked this over a double boiler for about half an hour. ( You don't have to stand there stirring for half an hour. Turn the heat low and stir it up every five minutes. ) When cool I whipped a pint of heavy cream mixed with a 1/2 cup of 10x sugar and folded it into the curd. I made lady fingers and lined the molds I was using with them. I soaked the ladyfingers with lemon syrup and piped the cream into the molds. I put them in the freezer as this is a 'semi-fredo,' or partly frozen dessert.
Now for the garnishes:
I combined sugar and corn syrup and made a caramel which then was spun into art deco type garnishes.
I scraped lemon peel and added granulated sugar to it. I call this fairy dust in my kitchen.
I made candied lemon peel and stored it in lemon syrup. I did the same with oranges sent to me from White Flower Farms.
I made a syrup from pomegranate juice.
I had on hand, in my freezer what I call paint. There was reduced passion fruit puree, and also some fresh plum puree that I had left from making plum tort for someone.
The Lemon Chiffon's were removed from the the freezer and freed them from their molds using a knife blade dipped in water. Wait a few minutes to allow the lemon chiffon's,to thaw to their semi-frozen state which is the perfect temperature for enjoying them.
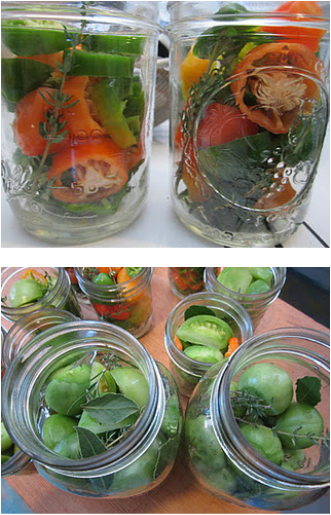
_ Green Tomatoes
As the growing season draws to a close, and the atmosphere is no longer warm enough to ripen the many tomatoes still on the vine, green tomatoes are one of the last products our gardens have to give.
What can be done with them? They can be fried or battered sweet or savory, but I tire of them quickly. I have also made green tomato ice cream. It may sound bizarre, but it is great, and unlike anything anyone who has tried it has ever tasted. Pickles, and green tomato pie are my favorites. I had one habenero plant which burst into intense production at the end of September, and by last week had produced more than forty multicolored peppers which hung in clusters like Japanese lanterns. I decided to pickle them along with the green tomatoes.
I chose the simplest method. I sterilized the bottles, and then packed them with herbs and alternately, the tomatoes or habeneros. I salted the tomatoes which I had sliced into wedges, and let them weep their water out for a few hours. I dried them and put them in the jars. I had enough babies for only one jar, and these I put in whole with just the stem removed. I put one slice of habenero into each jar of tomatoes. I cut the tops off of the peppers. Some I sliced, some I used whole.
I made a brine and poured it just boiling into the jars and sealed them. I will give the recipe tomorrow. Many times when doing a project, there are only a few pictures good enough to use. This time, the opposite was true and I spent over an hour picking out the ones you see here. Maybe it was my new 500 watt, sunlight counteracting photography bulb.
I make the green tomato pie almost exactly like making an apple pie, and they are wonderful. I put sugar on the tomatoes and let them weep their liquid, then I squeeze out most of the liquid. I then put more sugar and corn starch, and just the barest hint of cinnamon. Most of the time I resist the temptation to add brown sugar, more cinnamon or other spices, raisins etc. The taste of the green tomatoes is unique, and oddly compelling, and seems to resist complication. Like apple pie, the tomatoes can be sauteed first, but a true, classic American apple pie starts with raw fruit - and that is how I like my green tomato pie.
My favorite pie dough is made by working 3 ounces of vegetable shortening into 18 ounces of flour, to which I add 14 ounces of almost frozen butter cut into 1/2 inch cubes. You may add salt if you wish. I use two pastry scrapers to cut the butter and flour together. ( I like to use paint scrapers from the hardware store, instead of the kitchen ones. I use them for everything, and I find them easier to hold. ) A solid strong pastry blender is good too. Avoid the wire ones, they always seem to get bent cutting butter of the hardness I like. When the mixture looks like rough meal, flake it with your fingers a bit, and then use the blender, or two scrapers again to break up any clumps. Add 1/2 to 3/4 cup ICE water. Take the trouble to put ice and water together and then strain it. The reason for this is that if you have worked the dough a little too long, if it is a warm day or a warm kitchen the flour will absorb some of the butter, instead of forming the hundreds upon hundreds of layers necessary for puffing up beautifully. Ice water is fool proof in this regard. Start with 1/2 cup of water and hold back the rest. The least amount of water you can use, and still have the dough come together produces the tenderest flaky pastry. Just press the mass together and let it sit. The molecules need time to absorb the water on the microscopic level, and only time will allow this to happen. Use the heel of your hand and press, touching as little as possible. The warmth of your hands is a danger to the dough. Put the bowl in the freezer if you need more time. If after ten minutes or so, the dough still crumbles when touched, and you can still see dry flour, sprinkle a little more ice water. This may seem like too much trouble, or unnecessary, but the result is the lightest, tenderest, flakiest dough you have ever tried. I promise. Let the dough rest in the fridge for an hour before using. I also give the dough a couple of turns ( like puff pastry ) to give it more pizzazz. Questions? Want to tell me off? Call the Chefworks Hotline: 551-200-9359
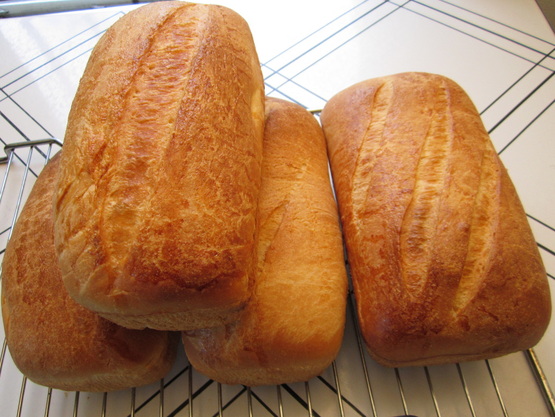
_ A Few Helpful Hints For Making and Baking Sweet Yeast Breads
1- Keep the dough as wet as possible, while still being able to handle it.
2- Don't stint on the kneading.
3- Use a thermometer to check the internal temperature of the bread at the end before taking it out of the oven. If it is 190-200 degrees F, it is done!
Experience and practice are the best teachers, even when you have a guide ( a teacher or a recipe ).
Even failure, while daunting, makes you wise and able.
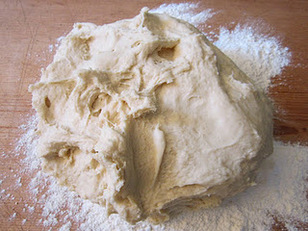
On the left is dough kneaded sufficiently, ready for the first rise
I am making stollen, traditional Christmas sweet bread made in Teutonic countries like Germany and Sweden, and American style raisin bread. The softest most luxurious pastry style breads benefit from using the least amount of flour which can be added to the liquid, and still be handled. Always withhold some of the flour while mixing, slowly adding flour until the dough just begins to come together and clear the bowl. The dough should still be slightly sticky. Place the dough on a generous amount of flour on the work surface and begin to knead. The temperature and humidity in the room, plus the amount of flour already in the dough will determine how much flour the dough will accept. As the dough sticks, just clear the surface with a scraper, sprinkle with flour, and continue kneading. The dough should remain supple but not wet. Resist the temptation to make the dough look "perfect," in other words perfectly smooth. it should be as moist and sticky as possible, while still allowing you to be able to work with it. During the first rise, the dough will absorb the moisture ( on the cellular, microscopic level ) which no amount of kneading is able to force into the dough. The dough should almost triple in bulk, and a finger poked into the dough should produce a dent which does not spring back.
When kneading by hand, allow 10-15 minutes of kneading. Diligence at this step will reward you with fine results. (and it is good exercise ) Most household mixers are not designed for dough kneading. They come with a dough hook, but this is for mixing, which is an extremely messy job if done by hand in a bowl or on tabletop. The kneading of soft yeast dough’s and certainly true breads will stress and even burn out your mixer, and kneading by hand conveys an encyclopedia of sensual information. It is an education in and of itself.
The baking time given in a recipe is only an approximation. Again, the conditions which prevail in your kitchen and oven are the gospel which must be attended. Most every oven has its quirks, strengths and faults.
People often use a thermometer to check a roast, but if you use one to check the internal temperature of your bread, it will take the worry and stress out of the indecision which occurs sometimes at the moment of truth - the moment the bread is ready to be removed from the oven
1- Keep the dough as wet as possible, while still being able to handle it.
2- Don't stint on the kneading.
3- Use a thermometer to check the internal temperature of the bread at the end before taking it out of the oven. If it is 190-200 degrees F, it is done!
Experience and practice are the best teachers, even when you have a guide ( a teacher or a recipe ).
Even failure, while daunting, makes you wise and able.
On the left is dough kneaded sufficiently, ready for the first rise
I am making stollen, traditional Christmas sweet bread made in Teutonic countries like Germany and Sweden, and American style raisin bread. The softest most luxurious pastry style breads benefit from using the least amount of flour which can be added to the liquid, and still be handled. Always withhold some of the flour while mixing, slowly adding flour until the dough just begins to come together and clear the bowl. The dough should still be slightly sticky. Place the dough on a generous amount of flour on the work surface and begin to knead. The temperature and humidity in the room, plus the amount of flour already in the dough will determine how much flour the dough will accept. As the dough sticks, just clear the surface with a scraper, sprinkle with flour, and continue kneading. The dough should remain supple but not wet. Resist the temptation to make the dough look "perfect," in other words perfectly smooth. it should be as moist and sticky as possible, while still allowing you to be able to work with it. During the first rise, the dough will absorb the moisture ( on the cellular, microscopic level ) which no amount of kneading is able to force into the dough. The dough should almost triple in bulk, and a finger poked into the dough should produce a dent which does not spring back.
When kneading by hand, allow 10-15 minutes of kneading. Diligence at this step will reward you with fine results. (and it is good exercise ) Most household mixers are not designed for dough kneading. They come with a dough hook, but this is for mixing, which is an extremely messy job if done by hand in a bowl or on tabletop. The kneading of soft yeast dough’s and certainly true breads will stress and even burn out your mixer, and kneading by hand conveys an encyclopedia of sensual information. It is an education in and of itself.
The baking time given in a recipe is only an approximation. Again, the conditions which prevail in your kitchen and oven are the gospel which must be attended. Most every oven has its quirks, strengths and faults.
People often use a thermometer to check a roast, but if you use one to check the internal temperature of your bread, it will take the worry and stress out of the indecision which occurs sometimes at the moment of truth - the moment the bread is ready to be removed from the oven
|
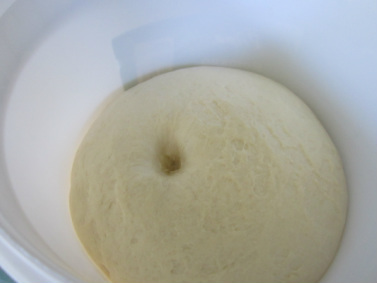
The dent which shows it has risen sufficiently, and is ready to punch down for the second rise.
|
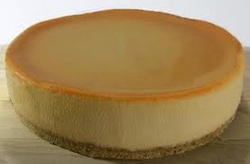
__Cheese Cake Adventure
Cathy, A Vietnamese lady who runs a liquor store in my neighborhood, after receiving my business card and viewing my website, said she goes to Brooklyn to buy Junior's cheese cake. I said I can make cheese cake as good as theirs, why not buy it from me? Cathy said give me a sample. If I like it, I will order one. I looked on line for the recipe and made it. I made small ones with graham cracker crust, and a big one with sponge cake on the bottom ( like they do at Junior's ), using my own recipe for sponge cake. A friend said, "I love Junior's cheese cake, but after the first day it's not as creamy." With this in mind, when I made the batter, it looked too thick, so I more than doubled the cream called for in the recipe. What happened was the best, creamiest, silkiest, cheesecake I ever ate. I have since been getting orders from almost everyone I give samples to. ( Including Cathy )
This adventure solved a problem for me. I too, had been disappointed with cheese cake recipes I have made and tried over the years and for the same reason my friend was disappointed. It is not as creamy after the first day, and sometimes is dry, thick and unpleasant to eat. The reason for this is:
All instructions for making cheese cake say to bake the cake until the top is no longer jiggly. That is the mistake, right there. Cheese cake, like it's cousins: pumpkin pie, coconut custard pie, key lime pie, quiches etc., is a custard. That means a liquid combined with eggs which is then baked. The proteins in eggs set at about 160 degrees Fahrenheit. With the addition of sugar and liquids, ( water, milk, cream, ) the temperature at which the custard will set is 175- 180. This is the reason for cooking the cheesecake inside a pan of water. Water cannot get higher than 212 degrees F except under pressure, ( or when it becomes a vapor ). The "water-bath" as this method is called, makes sure the cheesecake is protected from the 325-375 degree F temperatures which most cheese cake recipes call for. This method assures, provided you take it out of the oven soon enough, that the cheesecake will get to the temperature required to set the proteins in the eggs slowly. Why do this? For the same reason that a car going at 100 miles an hour cannot stop as quickly as one which is going 30 mph. If the custard is brought to 180 degrees F in a 350 degree F oven without the water protecting it, the custard is well on its way to being way over 200 degrees by the time it cools down. (curdled and over-cooked. It cannot "stop on a dime," as it were. This is why people over cook meats. If the meat is rare ( 120 degrees F ) when it comes off the fire, it will be 130-135 degrees F when it cools down. In other words, medium rare.
So, I took my cheesecake out while it was a bit jiggly, and tooth pick inserted did not come out dry, it was coated with cheesecake batter. If you do this, you must leave it overnight until you can unmold it and cut it. It is cream cheese, and it will almost set without cooking it. simply add cream to any cheese cake recipe, until it looks like very thick pan cake batter, and take it out of the oven while it is still "jiggly," like I did, and you will never go back to the old way of doing it.
